If you want to upcycle glass jars and bottles into stunning apartment planters, you are in the right place. I kept a large, empty glass pasta sauce jar on my kitchen counter for three weeks after finishing the dinner it contained, vaguely planning to do something creative with it. Eventually, during a busy afternoon of indoor plant maintenance, I placed a fresh golden pothos cutting into some water inside it, purely as a temporary measure while I searched local garden centres for a proper ceramic pot. That was eighteen months ago. Today, that small cutting has transformed into a substantial, cascading houseplant, the glass jar looks exactly right sitting on my living room shelf, and I have not bought a conventional plastic container for it since.
Upcycling everyday household glass jars and bottles into indoor planters is one of those wonderful sustainable projects that costs almost nothing, looks genuinely sophisticated, and requires absolutely zero advanced gardening skills. For urban apartment renters looking to maximize their green space while reducing waste, it is the perfect weekend project. Here is a comprehensive guide to everything that actually works when turning kitchen recycling into stunning botanical displays.
Why Glass Containers Are Perfect for Indoor Plant Cultivation
From a structural standpoint, glass is an exceptional medium for housing indoor flora. It is entirely non-porous, meaning it does not absorb moisture, stagnant water, or external household chemicals over time. This makes it incredibly hygienic for delicate root systems and remarkably easy to clean between planting cycles. Additionally, glass carries a natural weight that provides excellent physical stability for taller, top-heavy tropical cuttings or trailing vines that might tip over in lightweight plastic nursery pots.
The absolute best feature of utilizing transparent glass, however, is the visual access it grants you. It allows you to monitor internal water levels, soil moisture retention, and intricate root development in real time without ever disturbing the plant’s delicate ecosystem.
The main limitation to keep in mind is drainage. Most standard glass jars and consumer bottles do not feature holes at the base, which makes them highly unsuitable for traditional soil planting without proper structural modifications. The solution to this common constraint is simple: you must either utilize them strictly for water-based plant propagation, or construct a strategic internal drainage ecosystem within the container for traditional soil potting.
Ideal Glass Containers for Creative Apartment Upcycling
Before taking your recycling bin to the street this week, look for these specific premium glass shapes that look for these specific premium glass shapes that elevate home decor instantly, often found in affordable international home retail collections:
- Wide-Mouth Pasta and Preserve Jars: These feature wide openings and stable bases, making them the perfect scale for housing medium-sized established houseplants or thick root clusters.
- Elegant Wine and Spirit Bottles: These slender vessels look incredibly sophisticated when displaying single, minimalist vine cuttings or long trailing foliage. They can also double as beautiful botanical bud vases on a dining table setup.
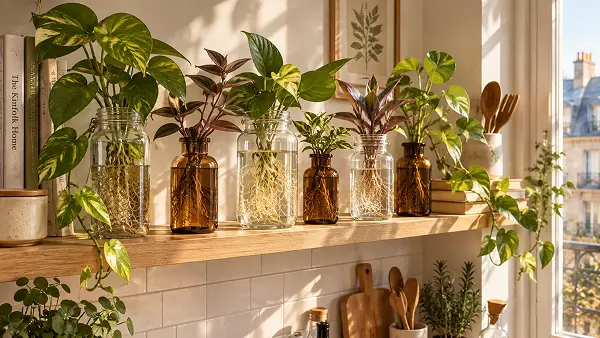
- Vintage Apothecary and Amber Medicine Bottles: Highly prized in Scandinavian interior design, these amber, blue, or deep green glass containers are exceptional for stylized propagation stations, as the darker glass protects delicate new roots from intense, direct solar radiation.
- Large Gourmet Olive Jars: These offer a generous soil and water capacity, making them ideal for small, established tropical plants that enjoy a deep root environment.
Method 1: The Water Propagation Station (Zero Effort)
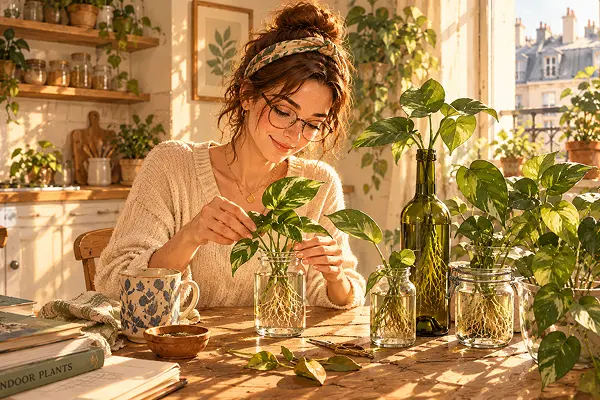
This is the simplest and most instantly rewarding method for repurposing any glass vessel. Water propagation bypasses the drainage problem entirely because soil is removed from the equation. To build your station, simply fill your clean glass jar with filtered or resting rainwater, take a healthy houseplant cutting that features at least one visible root node, and place it gently inside.
Position the container in a spot that receives bright, indirect natural light. To maintain high oxygen levels in the water and prevent fungal growth, refresh the liquid every seven to ten days. Watching the thick white roots develop through the clear glass over the weeks is one of the most therapeutic and satisfying experiences an indoor gardener can have.
- Best Plants for This Method: Golden Pothos, Tradescantia (Inch Plant), Heartleaf Philodendron, Coleus, and decorative Sweet Potato Vines.
Method 2: The Layered Soil Method (For Closed-Bottom Jars)
If you wish to plant directly into soil within a jar that lacks drainage holes, you must build an internal water-table layer at the absolute base of the container before adding any growing medium. This technique ensures that excess water sits away from the roots, preventing deadly root rot.
- The Drainage Base: Add a solid 2 to 3 centimetre layer of clean river pebbles, coarse gravel, or decorative horticultural grit at the absolute bottom of the glass jar to collect excess moisture.
- The Purification Layer: Add a thin, crucial layer of activated charcoal over the pebbles. Activated charcoal acts as a natural water filter, absorbing impurities, preventing bacterial accumulation, and eliminating foul odors inside the closed environment.
- The Soil Medium: Add a high-quality potting mix that is heavily amended with perlite to ensure a light, airy, and free-draining structure.
- Planting: Position your small plant inside and water it with extreme restraint. Because there are no escape holes, a tiny splash of water goes a very long way.
This closed-bottom soil method works beautifully for small tropical specimens that thrive in consistently humid, moist conditions, such as delicate ferns, vibrant forest mosses, small Calathea varieties, or miniature succulents (provided you use a highly gritty, desert-like sand mix).
Creative Styling and Displaying Tips for Your Upcycled Collection
To ensure your homemade planters look like an intentional, high-end interior design choice rather than random kitchen clutter, implement these simple styling rules:
- The Power of Grouping: Gather containers of varying heights, shapes, and glass thicknesses together in a cluster on a windowsill or shelf rather than scattering them individually across the room. Visual asymmetry creates a far more compelling design impact.
- Play with Light Tones: Mix amber glass, green glass, and crystal-clear jars together. The interplay of morning sunlight catching the different tinted glass tones creates beautiful, warm reflections on your walls.
- Add Organic Textures: Wrap the necks of plain bottles with natural jute twine, minimalist copper wire, or dried woven grasses to inject a rustic, tactile warmth that complements the green foliage perfectly.
- Functional Labels: Use liquid chalk markers to write the botanical names of your cuttings directly onto the glass. This looks beautifully functional, especially if you are propagating fresh kitchen herb cuttings.
Look Inside the Recycling Bin First
That original pasta sauce jar is still sitting proudly on my shelf today. Over the months, that single pothos has been trimmed back twice and successfully propagated into four additional glass containers, all sourced entirely from my weekly recycling pile. The entire vibrant collection cost me absolutely nothing except the price of the original mother plant.
Before you take your glass recycling out to the curb this week, take a closer look. There is almost certainly a beautiful, sustainable new planter waiting to be discovered inside.
About Olivia
Olivia is an interior styling writer who loves small-space urban living, creative indoor horticulture, sustainable home decor, and practical, budget-conscious household hacks that help everyday readers build beautiful, intentional, and eco-friendly homes.